

Last Updated: October 24, 2026
Quick Summary
A saddle fitting gauge measures the contours of your horse's back, wither shape and width, back length, and other key fit points, taking the guesswork out of choosing a saddle. Place the gauge just behind the scapula marks and work back in 2-inch increments to the last rib, recording width and contour at each station.
- Measure on level ground with your horse standing naturally and square, not on a pad or thick coat.
- Zero and lock the gauge before placement, then seat both arms with light, even pressure simultaneously.
- Take three repeat readings at each station; if they differ by more than 1/4 inch, reset and try again.
- Record station location, width in inches, contour or angle, and repeat readings in a table for future reference.
- Compare your wither width to saddle gullet specifications with about half-inch clearance on each side to prevent pinching.
Table of Contents
- What a Saddle Fitting Gauge Does and Why You Need One
- How to Measure a Horse for a Saddle Using a Gauge
- Saddle Fitting Gauge Placement: Where and How to Position It
- How to Measure Saddle Gullet Size and Interpret Readings
- Reading Your Gauge Results and Translating Them into Saddle Choices
- Signs of Poor Saddle Fit You Can Spot Beyond the Gauge
- Common Measurement Mistakes and How to Avoid Them
- Finding the Right Saddle at Horsey Horse Store
- Frequently Asked Questions
What a Saddle Fitting Gauge Does and Why You Need One
A poorly fitting saddle causes soreness, movement restrictions, and behavioral problems, and your horse can't tell you it hurts (pubmed.ncbi.nlm.nih.gov).
The gauge presses gently against your horse's back at specific points and records the shape and measurements.
Most riders skip this step, buying on size alone or what worked for another horse, then wonder why their horse acts out. A saddle fitting gauge prevents that cycle.
How to Measure a Horse for a Saddle Using a Gauge
Preparing Your Horse and Workspace
Your horse should stand on level ground in a calm, quiet space, a barn aisle, flat paddock, or level stall. Uneven footing throws off measurements.
Have your horse stand naturally, don't stretch the neck forward or tuck it back. A helper holding the horse still frees both your hands.
Understanding Gauge Anatomy and Settings
Most saddle fitting gauges have two curved arms that mirror your horse's back shape and move independently to record the contours. Some have a dial or digital readout; others use a template system.
Before use, wipe the contact surfaces, check that moving parts slide smoothly, and read the manufacturer's instructions.
The gauge measures at multiple points along the back, withers, saddle support area, and back of the seat area, and each tells you something different about fit.
The wither measurement shows how much clearance you need, back length tells you if the saddle will sit in the right spot, and side measurements show how the bars will contact the back.
Saddle Fitting Gauge Placement: Where and How to Position It
Correct placement is the difference between a reading you can trust and one that sends you shopping for the wrong saddle. Measure the surface the saddle tree will actually contact, not the highest point of the withers.
Find the landmarks first
Before you touch the gauge, locate three reference points with your hands:
- The back of the scapula (shoulder blade). Slide your fingers along the horse's side until you feel the rear edge of the shoulder blade. The saddle's front bar tips should sit behind this edge so the shoulder can rotate freely.
- The highest point of the withers. This is your zero point for front-to-back placement.
- The last rib. Find the last rib that attaches to the spine; the saddle should not extend behind it.
Mark the rear edge of the scapula on both sides with chalk, these marks are your forward limit.
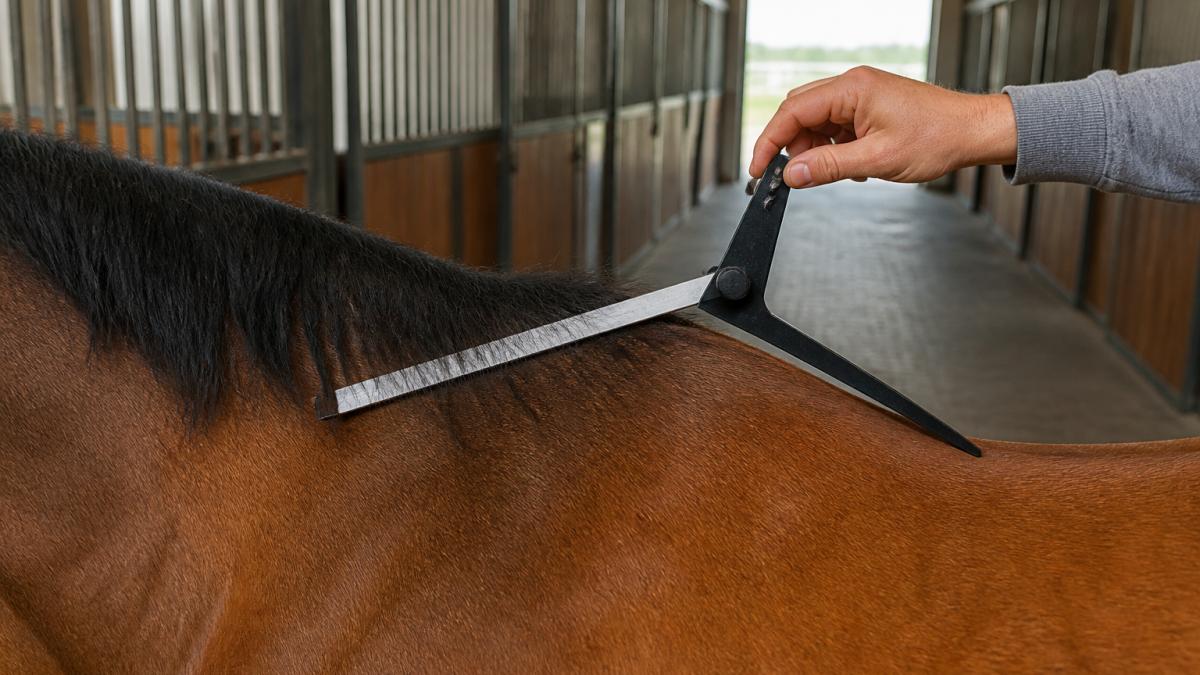
Set the gauge before it touches the horse
A gauge that isn't zeroed or locked will drift as you press it down. Before placement:
- Zero the arms. Off the horse, close the arms fully and confirm the scale reads zero, or set the template to neutral per the manufacturer's instructions.
- Lock the pivot. Engage any locking screw or detent so the arms hold their shape once lifted; a gauge that relaxes when you lift it gives you nothing to read.
- Check for slop. Wiggle each arm, side-to-side play at the pivot shows up as a wider or narrower reading than the horse actually is.
Place, settle, and read
- Stand on the near side, level with the horse's barrel.
- Bring the gauge down so both arms contact the horse at the same moment; one arm landing first pushes the tool off-center.
- Seat the arms with light, even pressure, enough that the hair parts under the contact points, not enough to indent the muscle.
- Check that the crossbar or spine indicator sits parallel to the spine. If tilted, lift and reset rather than twisting it into place.
- Lock or read the scale while the gauge is still on the back; reading after you lift introduces error on gauges that do not lock.
- Lift straight up, note the reading, and repeat twice more. If the three readings differ by more than about 1/4 inch, reset and try again.
Work front to back in fixed increments
Take the first reading just behind the scapula marks, then move back in 2-inch increments until you reach the last rib, four to six stations on a typical riding horse. Record each station's width and contour.
Placement mistakes that ruin the reading
- Measuring on the withers themselves. The withers are not a bearing surface; a reading at the highest point is narrower than the saddle channel needs and pushes you toward an undersized gullet.
- Measuring too far back. Readings behind the last rib describe a part of the back the saddle should never touch.
- Letting the horse stand crooked. A parked hind leg shifts the spine and changes every reading, square the horse up first.
How to Measure Saddle Gullet Size and Interpret Readings
The saddle gullet is the channel running down the center of the saddle under the pommel, the space between the two bars of the saddle tree. Gullet size is measured in inches, typically 5 to 8 inches for English saddles.
Your gauge readings tell you what gullet size your horse needs, and the wither measurement is the key data point: narrow withers need a narrower gullet, wide withers a wider one.
Compare your wither width to the saddle specifications you're considering.
Bar size goes hand-in-hand with gullet size.
Don't just look at gullet size alone. A saddle with the right gullet width but wrong bar angle won't fit. The gauge gives you both measurements. Use them together.
Reading Your Gauge Results and Translating Them into Saddle Choices
A gauge reading is only useful if you can turn it into a saddle specification, the step that decides whether you order the right saddle or return the wrong one.
Build a measurement record
For each station along the back, record four things:
- Station location (for example, "2 inches behind scapula," "4 inches," "6 inches").
- Width reading in inches at that station.
- Contour or angle if your gauge captures it, the shape of the arc, not just its width.
A simple table works better than prose. Keep it with your horse's records and update it every season, after any significant weight or fitness change, and whenever a saddle starts sitting differently.
Translate width into gullet channel
The width reading just behind the scapula is your primary gullet input. The gullet channel must be wide enough that the bars clear the withers and spinous processes with roughly a half-inch of clearance on each side on the bare back.
A practical translation:
- If your front station reads narrow and the gauge angle is steep, you need a narrower tree or gullet.
- If the front station reads wide and the angle is shallow, you need a wider gullet and flatter bars.
- If the front station is moderate but the mid-back stations widen sharply, you need a saddle with more flare through the middle, a standard medium tree will bridge and concentrate pressure.
Don't buy on gullet width alone: two saddles with the same channel can have very different bar angles, and bar angle determines whether the saddle sits level or rocks.
Translate contour into bar angle
Compare the gauge arc at each station to the saddle's bars, which should follow the same curve as the back:
- Bars too narrow in angle sit on the sides of the withers and pinch.
- Bars too wide in angle rock front to back and concentrate pressure at the cantle or pommel.
- Bars that match the arc distribute pressure along the whole bearing surface.
If bar angle isn't on the spec sheet, many manufacturers don't publish it, ask the seller for a photo of the saddle's underside with a straight edge across the bars, or compare the saddle's rocker to your gauge photos.
Translate back length into saddle length
Your rearmost station at the last rib marks the maximum bearing surface; panels or bars extending past it press on the loin, the weakest part of the back. Compare the saddle's panel length to the distance from your scapula mark to the last-rib station, if the saddle is longer, size down.
Match seat size to the rider, not the horse
The gauge tells you nothing about seat size, which is a rider measurement determined by thigh length and position in the saddle. Keep the two decisions separate: gauge data chooses the tree; the rider's measurements choose the seat.
A repeatable decision sequence
- Confirm your station readings repeat within about 1/4 inch.
- Identify the narrowest front reading, that sets your minimum gullet.
- Identify the widest mid-back reading, that sets your bar flare.
- Confirm the saddle's panel length fits inside your last-rib station.
- Confirm bar angle against your gauge contour photos.
- Only then compare seat size to the rider.
When the numbers do not add up
If your readings are inconsistent, or a saddle that matches your numbers still sits poorly, the cause is usually one of three things: the horse wasn't standing square, the gauge wasn't zeroed or locked, or the readings were taken over a pad or thick winter coat. Reset the conditions and measure again before concluding the saddle is wrong, a second session is cheap; a returned saddle is not.
At Horsey Horse Store, we publish gullet width and seat size on every saddle listing so you can run this sequence against real specifications. Our Pro Fit Horse Saddle is available in multiple tree widths, and with your gauge record in hand, matching it to a listing takes minutes instead of guesswork.

Signs of Poor Saddle Fit You Can Spot Beyond the Gauge
A gauge gives you data; your eyes and your horse's behavior give you confirmation.
Stiffness, a shortened stride, or reluctance to move forward all signal fit problems.
Check the saddle position after riding: it should sit level and centered.
Understanding the underlying causes of poor saddle fit helps you troubleshoot.
Run your palms along the sides and under where the saddle sits.
Common Measurement Mistakes and How to Avoid Them
The most common mistake is measuring on uneven ground, slopes and dips throw off readings.
Don't measure with a saddle pad on, the pad changes the contours.
Avoid measuring when your horse is tense or moving, since a tense horse holds muscles differently.
Forcing the gauge hard into the back can bruise tissue.
Don't assume your horse's measurements stay the same forever. Horses gain or lose weight.
Finding the Right Saddle at Horsey Horse Store
We stock saddles in multiple configurations, with different tree widths and seat sizes to match the measurements you've gathered, whether your horse has narrow withers or a broader back.
Tips for fitting horse saddles online walks you through using your gauge measurements when shopping, reading saddle specifications and matching them to your data, removing the risk from buying tack online.
Your saddle pad choice matters too. The right pad adds comfort and can help with minor fit adjustments. How to choose the right saddle girth length ensures your complete setup works together.
Take your time, a quality saddle is an investment, and getting it right means years of comfortable riding for both you and your horse.
Frequently Asked Questions
What is the 3-finger rule for saddle fit?
The 3-finger rule means you should be able to fit approximately two to three fingers between the saddle's gullet and your horse's withers when the saddle is positioned correctly on the horse's back. This clearance ensures the saddle doesn't press on the withers, which can cause pain and poor saddle fit. A saddle fitting gauge helps you measure this clearance precisely, giving you an objective way to check if the space is adequate rather than relying on feel alone.
How often should you check your horse's saddle fit?
Check your horse's saddle fit at least twice a year, or more frequently if your horse's weight or muscle changes significantly. Seasonal weight fluctuations, training intensity, and age all affect how a saddle sits on your horse's back. Using a saddle fitting gauge every few months helps catch fit problems early before they cause discomfort or damage to your horse's back. If you notice signs of poor saddle fit like white hairs, soreness, or behavioral changes, measure immediately.
Can a saddle fitting gauge tell you whether a saddle fits?
A saddle fitting gauge is one valuable tool, but it's not the only assessment method. The gauge measures wither clearance and gullet width, which are critical fit points, but saddle fit also depends on saddle balance, contact along the back, and how the saddle distributes your weight. Use the gauge as part of a complete fit check that includes visual inspection, hand checking for contact, and observing your horse's behavior under saddle. If the gauge shows poor clearance, that's a clear sign the saddle won't fit well.
What gullet size fits most horses?
Most general-purpose horses fit saddles with gullet sizes ranging from 7 to 8 inches, though this varies widely based on horse conformation, breed, and age. Narrow-backed horses may need a 6.5 to 7-inch gullet, while broader horses require 8 to 8.5 inches or larger. The only way to know your horse's correct gullet size is to measure with a saddle fitting gauge. Once you know your horse's gullet measurement, you can confidently select saddles like the Pro Fit Horse Saddle that match that specification.
A saddle fitting gauge transforms saddle shopping from a guessing game into a data-driven process. You've learned how to prepare your horse, position the gauge correctly, take accurate measurements, and interpret what those numbers mean. The next step is matching your measurements to actual saddles. With your gauge data in hand and Horsey Horse Store's selection of practical tack, you can find a saddle that fits your horse's unique shape and supports comfortable riding for years to come.
