

Table of Contents
- Why Saddle Pressure Points Matter for Your Horse's Back
- Behavioral Signs of Saddle Pressure Points
- Physical Signs of Horse Back Soreness Symptoms
- Saddle Sweat Pattern Analysis: Reading Dry Spots
- How to Check Saddle Fit Before Pressure Points Develop
- Saddle Pad Material and Post-Ride Recovery Protocols
- Conclusion: Act Early on Saddle Pressure Points
- Frequently Asked Questions
Last Updated: September 16, 2026
Why Saddle Pressure Points Matter for Your Horse's Back
A horse that flinches when you tighten the girth is not being dramatic. It is telling you something is wrong with the fit of the saddle.
Behavioral Signs of Saddle Pressure Points
Behavioral changes are usually the first sign owners notice, and they are easy to dismiss as attitude problems. A horse in pain cannot tell you where it hurts, so it communicates through evasion, tension, and resistance. Learning to read these signals is the fastest way to catch saddle pressure points before they cause lasting damage.
Cold-Backed Behavior and Resistance to Mounting
Cold-backed behavior describes a horse that flinches, hollows its back, or stiffens when the saddle is placed or the girth is tightened. Some horses dip away from the mounting block or refuse to stand still for mounting altogether. A common mistake is writing this off as a training gap. In practice, a horse that was previously easy to mount and suddenly is not is usually reacting to pain, not disobedience.
Under-Saddle Evasion: Bucking, Tail Swishing, and Pinned Ears
Watch for bucking, tail swishing, pinned ears, and gait irregularity once you are in the saddle. These are classic signs of pressure points and muscle soreness under the panel. Many riders attribute a sudden reluctance to move forward to laziness. What most guides miss is that a horse evading contact, tossing its head, or crow-hopping on a specific rein is often protecting a sore spot on one side of the back.
Physical Signs of Horse Back Soreness Symptoms
Physical signs are what you can see and feel with your own hands, and they are more reliable than behavior alone because they map directly to where force is being concentrated. Run your fingers along both sides of the spine and the area under the panels after every ride. Consistency matters: a baseline of what "normal" feels like for your horse makes changes obvious.
What a Pressure Point Actually Does to Tissue
Sustained focal pressure above roughly capillary closing pressure starves the muscle and skin beneath the panel of blood flow. The tissue responds in a predictable sequence: first heat and a flinch response, then swelling, then hair follicle damage, then muscle wasting. That sequence is why the same spot shows up as a hot spot one week and a white patch months later.
Muscle Atrophy, Dipping, and Lumbar Sensitivity
Muscle atrophy shows up as hollows or depressions on either side of the spine, often just behind the scapulae or over the lumbar region. When one side dips more than the other, it usually points to a saddle that is bridging or rocking and concentrating load unevenly. Press gently along the lumbar area. A horse that flinches, dips its back, or pins its ears during palpation is telling you the saddle tree or panel contact is off.
How Back Shape Changes What You See
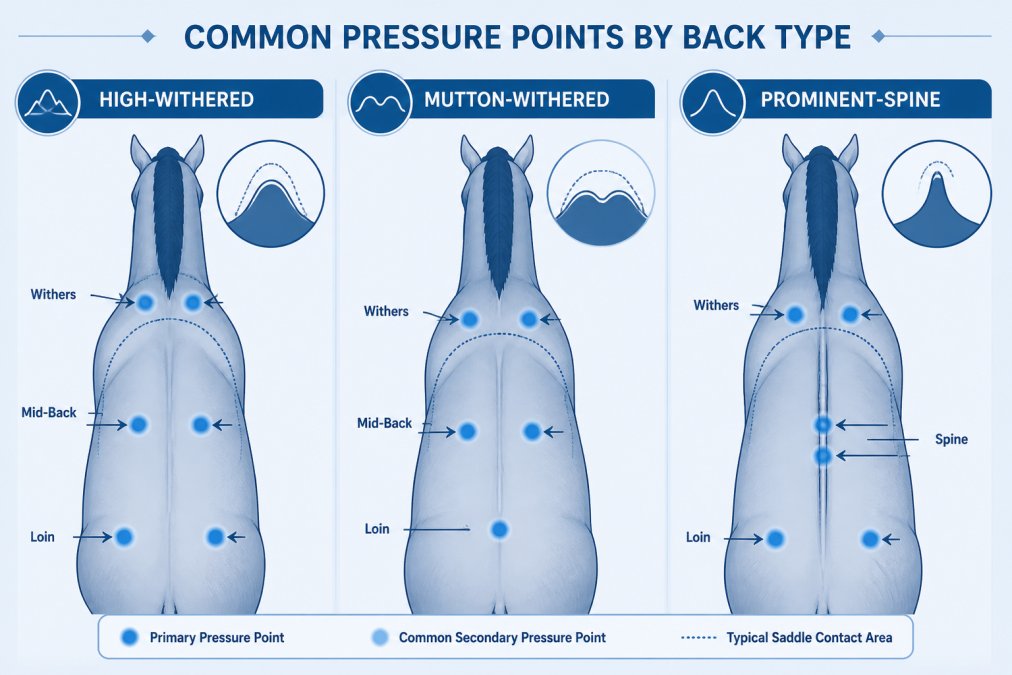
Pressure points do not present the same way on every back, and this is where most guides stop short. A high-withered horse with a narrow, steep spine tends to show pressure at the withers and along the top of the shoulder blade, because the tree sits down on the wither instead of clearing it. A mutton-withered horse with a broad, flat back and a low wither often shows pressure at the loin and behind the scapula, because the saddle rocks forward and back and concentrates load at the ends of the panel.
White Hairs and Palpation Findings
Saddle Sweat Pattern Analysis: Reading Dry Spots
Saddle sweat pattern analysis is the most objective diagnostic tool you have, and it costs nothing. After a ride, the sweat marks left on your horse's back show exactly where the saddle made even contact and where it did not. An even sweat pattern means even pressure. Dry spots mean the opposite: the saddle blocked airflow and circulation in that area, which is a pressure point in the making.
How to Check for Dry Spots After Riding
Check for dry spots immediately after untacking, while the sweat pattern is still visible. Work in good light and look at the whole panel area, not just the center.
Harrison Howard Dressage Saddle Pad →
- Untack immediately after the ride, before the sweat dries.
- Look at both sides of the back under where the panels sat.
- Identify any dry patches surrounded by wet, evenly sweated areas.
- Press each dry spot gently to check for flinching or heat.
- Photograph the pattern so you can compare it after your next ride.
- Repeat after several rides to confirm the pattern is consistent.
How to Check Saddle Fit Before Pressure Points Develop
Checking saddle fit before pressure points develop takes about five minutes and should happen before every ride, not once a season. A saddle that fit in spring may not fit in fall after a change in workload or condition. Here is a practical pre-ride check:
- Wither clearance: With the saddle on and girthed, you should fit two to three fingers between the pommel and the withers.
- Panel contact: Run your hand under the front of the panel. Even contact along the whole length, no bridging or rocking.
- Spinal clearance: The gullet channel should clear the spine down its entire length.
- Girth tightness: Tighten gradually and evenly. A horse that reacts to girth tightness is often reacting to a tree that is too narrow.
- Lateral stability: Rock the saddle side to side. Excessive movement means the tree shape does not match your horse's back.
Saddle Pad Material and Post-Ride Recovery Protocols
Saddle pad material directly affects how pressure distributes across the back, and it is the most overlooked variable in fit. A pad does not fix a saddle that does not fit, but the right material can bridge small gaps, cushion the scapulae, and wick heat away from a sore spot. The material matters as much as the thickness, and each type manages pressure differently.

How Pad Materials Manage Pressure
- Quilted cotton: Thin and breathable, with almost no pressure-diffusing structure. Good for daily schooling in warm weather, but it will not mask a bridging panel, and that is actually useful, because it lets you read the sweat pattern honestly.
- Foam-core mesh: The foam layer spreads load across a wider area than cotton and the mesh moves heat and moisture away from the back. Best for sweaty horses and humid conditions, but foam compresses over time and loses its pressure relief.
- Sheepskin: The dense fiber pile distributes pressure across many small contact points and traps a layer of air against the skin, which is why it is the traditional choice for thin-skinned, sensitive backs. It needs hand washing and air drying to keep the pile from matting.
- Thick felt: High structural density makes felt the best choice for long trail rides and for horses whose panels already contact evenly. Felt absorbs sweat and holds it, so it needs brushing and thorough drying between rides.
A worn-out pad of any type is worse than no pad at all, because a compressed or matted layer concentrates pressure instead of spreading it. Replace a pad when the loft no longer springs back under your hand.
Post-Ride Recovery Protocol
What you do in the thirty minutes after untacking determines whether a new sore spot resolves or becomes chronic. Work through these steps in order:
- Untack immediately and read the sweat pattern while it is still wet. Photograph it.
- Cool the back with a sponge or a gentle hose for several minutes to bring surface temperature down and restore circulation to the panel area.
- Hand-walk for ten to fifteen minutes to let the back muscles relax and blood flow return before the horse stands in a stall.
- Palpate both sides of the spine and the panel area. Note any heat, swelling, or flinch response and compare it to your baseline.
- Massage the sore area with flat hands using slow, circular pressure along the muscle beside the spine, never directly on the spine or on a hot, swollen spot. Work from the shoulder toward the loin for a few minutes.
- Give the back a full day off from riding if you found a new sore spot, and re-check before the next ride.
- Reassess the saddle before riding again. A sore spot that reappears in the same place after a rest day means the fit, not the workload, is the problem.
Conclusion: Act Early on Saddle Pressure Points
The hardest part of managing saddle pressure points is that horses rarely complain loudly. A flinch at the girth, a dry spot under the panel, a slight dip beside the spine: these quiet signs are the whole warning system. Catch them early and most cases resolve with a pad change, a fit adjustment, or a rest day. Ignore them and you are managing white hairs and atrophy for the rest of the horse's career.
Frequently Asked Questions
Why is my horse's back sore behind the saddle?
Soreness behind the saddle often comes from pressure points created by a saddle tree that is too narrow or panels that bridge instead of making even contact. When weight concentrates on the lumbar area, the muscles become tender and the horse may flinch during grooming or resist saddling. Check for heat, swelling, or a dipping profile behind the withers. A professional saddle fitter can assess panel contact and recommend adjustments or a different saddle.
What do uneven sweat marks on a horse's back indicate?
Uneven sweat marks, especially dry spots surrounded by wet areas, point to pressure points where the saddle blocks circulation and sweat production. A normal saddle sweat pattern is even on both sides of the spine with no dry patches. If you see a dry spot under the panel, that area is receiving too much pressure. Pair this with saddle sweat pattern analysis after every ride to catch problems early.
How can I tell if my saddle is causing pressure points?
Look for a combination of behavioral and physical signs: cold-backed behavior, resistance to mounting, white hairs, muscle atrophy, and dry spots in the sweat pattern. Palpate along the back for heat, swelling, or flinching. Also check saddle fit by running your hand under the panels to feel for bridging or rocking. If several signs appear together, have a professional fitter evaluate your saddle and consider a pad like the LeMieux Dressage Carbon Mesh Square Saddle Pad to improve pressure distribution.
How do I check for white hairs caused by saddle pressure?
White hairs from saddle pressure typically appear in the area under the panels, along the withers, or behind the shoulder. They grow in where repeated pressure has damaged hair follicles. Part the hair and look for patches of white against the base coat. These hairs are permanent, so early detection matters. If you find white hairs, stop using the saddle until a fitter checks it. A pad such as the Woolous Dressage Sheepskin Saddle Pad can help cushion sensitive spots while you address the root cause.