

Table of Contents
- What You'll Need Before You Start
- Step 1: Remove Hair and Debris from Every Tool
- Step 2: Wash Brushes and Combs with the Right Solution
- Step 3: Disinfecting Horse Brushes Without Damaging Bristles
- Step 4: Dry and Store Your Grooming Kit Correctly
- Material-Specific Care: Wood, Natural Fibers, and Synthetic Bristles
- When to Replace vs. Clean Your Grooming Tools
- Frequently Asked Questions
Last Updated: September 14, 2026
What You'll Need Before You Start
Cleaning horse grooming tools takes about 20 minutes and protects both your brushes and your horse's skin. Dirty bristles trap hair, dander, and moisture, breeding bacteria and fungal spores that transfer back onto your horse every time you groom (avma.org).
Gather everything first so you are not walking to the tack room mid-job. You will need:
- Two buckets, one for washing and one for rinsing
- A stiff brush or metal curry comb for debris removal
- Dish detergent or a mild equine-safe soap
- White vinegar and baking soda for DIY solutions
- A clean towel and a drying rack or mesh bag
- Rubber gloves if you plan to use bleach dilution
Riders often find themselves replacing brushes every season, sometimes because they haven't learned how to clean horse grooming tools properly, when many still have years of life left. Here is how to make your kit last.
Step 1: Remove Hair and Debris from Every Tool
Pull loose hair out of the bristles before any water touches the brush, wet hair mats down and becomes far harder to remove.
Work through each tool methodically:
- Hold the brush bristle-side down over a trash bin or bucket.
- Use a metal curry comb or your fingers to rake hair out from the base of the bristles.
- Tap the brush against the bucket rim to shake out dust and dander.
- For combs and shedding rakes, pick trapped hair out tooth by tooth with a hoof pick.
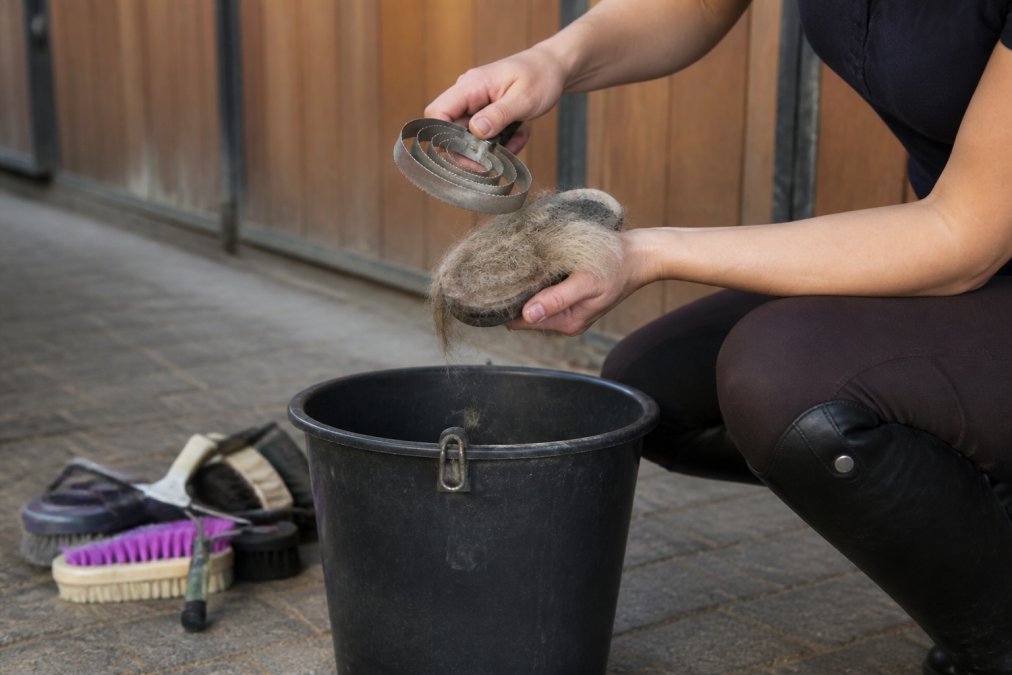
Skipping debris removal drives hair deeper into the bristle base, where it holds moisture and shortens the brush's life.
Tools for Breaking Down Stubborn Hair
Stubborn winter coat hair needs more than fingers: a metal curry comb is the workhorse, and a shedding rake handles the dense undercoat that clogs natural bristle brushes. For finer tools like a mane and tail brush, separate the hair in small sections rather than yanking it out, which damages bristles and bends pins.

Step 2: Wash Brushes and Combs with the Right Solution
Washing is where most grooming kits get properly cleaned or quietly ruined. A mild solution and lukewarm water handle most tools safely.
Fill one bucket with warm water and a little dish detergent. Swirl each brush bristle-side down, then work the soap through with your fingers. Avoid soaking wooden handles, since water breaks down the finish and causes cracking. Rinse in a second bucket until no suds remain, residue attracts dirt and irritates skin.
DIY Cleaning Solution Recipes
You do not need specialty products to clean horse grooming tools well. Two recipes cover almost every situation:
Everyday wash: One gallon of warm water plus a few drops of dish detergent. Safe for synthetic bristles, rubber curries, and plastic combs.
Deep clean soak: One part white vinegar to four parts water. Soak natural fiber brushes for 10 to 15 minutes to break down oils and odor, then rinse thoroughly.
Baking soda works as a gentle abrasive for dried mud on rubber tools: mix a paste with water and scrub with an old toothbrush.
Step 3: Disinfecting Horse Brushes Without Damaging Bristles
Disinfecting horse brushes is different from cleaning them. Washing removes visible dirt and hair; disinfecting kills the bacteria and fungal spores that cause skin conditions like dermatophytosis (the CDC). Disinfect periodically, not after every use.
Bleach is effective but harsh, so dilution matters: roughly one tablespoon per gallon of water. Submerge synthetic bristles and rubber tools for no more than 10 minutes, then rinse thoroughly. Natural fibers and wooden handles should skip bleach and use vinegar instead, since bleach degrades both.
Bleach Dilution and Safety
Handle bleach dilution outdoors or in a well-ventilated area, and always wear gloves. Never mix bleach with vinegar or ammonia, the combination releases dangerous fumes (the EPA). Rinse each tool until you cannot detect any bleach smell; residue can burn or dry out your horse's skin.
| Disinfecting Method | Best For | Soak Time | Rinse Required |
|---|---|---|---|
| Bleach dilution | Synthetic bristles, rubber | 10 minutes max | Yes, thorough |
| White vinegar soak | Natural fibers, wood | 10-15 minutes | Yes |
| Antiseptic spray | Quick touch-ups | Wipe only | No |
Step 4: Dry and Store Your Grooming Kit Correctly
Drying prevents mold, and it is the step most people rush. Damp bristles grow mildew within a day or two, especially in humid barns.
Lay brushes bristle-side down on a clean towel or mesh rack so air circulates. Never stand them upright in a closed container while wet, trapped moisture is what fungal spores need. Give tools a full day to air dry before they go back in the box.
A ventilated grooming bag or box keeps dust off without sealing in moisture. Keep the kit off the barn floor, and store each horse's tools separately if you rotate between horses.
Material-Specific Care: Wood, Natural Fibers, and Synthetic Bristles
Treating every brush the same shortens its life. Bristle and handle material determines how much water the tool can take, how long it needs to dry, and which cleaners degrade it. Most guides stop at "use mild soap," leaving out the two failure points that actually kill brushes: moisture trapped at the bristle base and in the handle.
Here is how to match your method to the material.
Wooden Handles
Wood is the most fragile part of any grooming tool: it is porous, and unfinished wood swells when wet. A swollen handle cracks the finish and loosens the bristle tuft from its socket. Once that socket is loose, water wicks inside on every wash and the brush becomes a mold reservoir.
- Wipe the handle with a damp cloth and a drop of mild soap. Do not submerge it.
- Dry immediately with a towel, then let it air dry fully before storage.
- Re-oil the wood once or twice a year with a food-grade mineral oil or a dedicated wood conditioner. A thin coat restores the finish and slows moisture absorption.
- If the handle already has a hairline crack, retire the tool. A cracked handle cannot be sealed reliably and will keep trapping moisture.
Natural Fibers (Boar, Horsehair, and Similar)
Natural bristles are protein-based and hold water far longer than synthetics. They absorb coat oils and develop odor faster, but they are gentler on the skin and distribute natural oils well, so they are worth preserving.
- Clean with the vinegar solution (one part white vinegar to four parts water) rather than detergent-heavy washes, which strip the fibers.
- Soak for 10 to 15 minutes, then rinse until the water runs clear.
- Squeeze excess water out with a towel, reshape the bristles with your fingers, and dry bristle-side down on a rack.
- Give natural fibers a full 24 hours to dry. In humid conditions, add a small fan or place the rack in a dry, air-conditioned space.
- Skip bleach entirely. Bleach degrades protein fibers and leaves them brittle.
Synthetic Bristles (Nylon and Plastic)
Synthetics are the most forgiving material: they do not absorb water, tolerate dish detergent and diluted bleach, and dry in a few hours. The main risk is heat, water above roughly 140°F can warp nylon bristles permanently.
- Wash with warm water and dish detergent, or disinfect with the bleach dilution described above.
- Rinse thoroughly and shake out excess water.
- Air dry bristle-side down. Synthetics can usually return to the box the same day.
Rubber Curries and Mitts
Rubber does not absorb water, but dried mud packs into crevices and hardens. A baking soda paste scrubs mud out without scratching. Rinse, then air dry. Rubber tools last for years but should be replaced once they harden, crack, or tear, since a torn edge catches and pulls hair.
The Drying Rule That Prevents Mold
Mold and mildew need moisture, warmth, and darkness, all supplied by a closed grooming bag in a humid barn. Dry every tool bristle-side down on a rack or towel for a full day before it goes back in the bag, so gravity pulls water out of the tuft instead of letting it pool at the base. If your grooming bag smells musty, mold is already present, wash the bag and re-dry every tool before the next use.
When to Replace vs. Clean Your Grooming Tools
Some tools can be cleaned back to safe condition; others cannot, and using them spreads bacteria, fungal spores, and skin irritants from one session to the next. The decision comes down to whether the tool can be fully cleaned and fully dried. If moisture or debris can hide inside it, it is a hygiene risk no matter how carefully you wash it.
Clean First, Then Inspect
Always clean the tool before judging it. Dirt and hair can make a serviceable brush look worn out. Once it is clean and dry, inspect it under good light.
Replace the Tool If You See Any of These
- Permanently splayed bristles. Bristles that stay bent or fanned out after drying no longer reach the coat evenly and cannot be reshaped.
- Bent, broken, or missing pins. A shedding rake or mane comb with damaged teeth scratches the skin and pulls hair instead of removing it.
- A cracked or split handle. A crack holds moisture and debris and cannot be sealed reliably. This is the most common reason a wooden brush becomes a mold source.
- A loose bristle tuft. If the tuft moves in its socket, water is already getting inside and the brush will not dry fully.
- Hardened, cracked, or torn rubber. A torn edge catches hair and can pull it painfully.
- Persistent odor after cleaning. A musty or sour smell that survives a full wash and dry means mold or bacteria are established in the material.
- Rust on metal components. Rust flakes off onto the coat and into the skin.
A Simple Decision Framework
Ask three questions in order:
- Can the tool be fully submerged or fully wiped without trapping water? If no, replace it.
- After a full clean and a 24-hour dry, does it still look, smell, or feel compromised? If yes, replace it.
- Is the tool used on a horse with a known skin condition? If yes, and it cannot be disinfected thoroughly, replace it rather than risk reinfection.
A well-cared-for natural bristle brush can last several years, while a synthetic brush used daily may need replacing more often. The key to longevity is ensuring the tool is dried completely after every wash.
Disposing of Old Grooming Tools Responsibly
Grooming tools mix materials, so they are hard to recycle through a single stream. A little sorting keeps them out of the landfill.
- Separate the components. Many brushes have a plastic or wooden handle, a metal ferrule or pins, and bristles. If the handle detaches, sort each piece into the right stream.
- Plastic handles and synthetic bristles. Check whether your local curbside program accepts rigid plastics. Many do; some do not. When in doubt, check your municipal waste program's accepted-materials list before tossing.
- Natural fiber bristles. Boar and horsehair bristles are compostable once separated from the handle and any metal. Add them to a compost pile rather than the trash.
- Metal pins and ferrules. Scrap metal is widely accepted at recycling centers and often at curbside programs.
- Rubber tools. Rubber is recyclable in some programs but not all. If your area does not accept it, consider repurposing a worn curry as a mud scraper for boots or buckets before discarding.
Don't Donate Contaminated Tools
A worn brush that still looks usable may carry fungal spores that survive for months. Do not donate or hand down a tool used on a horse with a skin condition unless it can be fully disinfected. For natural fiber and wooden tools, which cannot be bleached safely, disposal is the responsible choice.
Frequently Asked Questions
How often should I clean my horse grooming brushes?
Clean brushes used daily once a week with a deeper wash every two to four weeks. If your horse has a skin condition like dermatophytosis or you groom multiple horses, clean after every use to prevent cross-contamination. Barn managers with eight or more horses should set a rotating schedule so no tool sits dirty for more than a few days. Regular cleaning protects bristle integrity and keeps bacteria and fungal spores from building up.
Can I use Dawn dish soap to clean my horse brushes?
Yes, a small amount of mild dish detergent mixed with warm water works well for most synthetic bristles and rubber curries. Add a few drops to a bucket, swish the brush heads, and rinse thoroughly. Avoid soaking wooden handles or natural fibers for long periods, since water breaks down the wood and loosens bristle glue. For a gentler option on natural bristles, use a baking soda and warm water paste instead.
What is the best way to remove hair from horse brushes?
Start by rubbing the brush face against a metal curry comb or a stiff rubber mat to pull out trapped hair. For deeper buildup, use a hoof pick or a wide-tooth comb to lift hair from the base of the bristles. A horse shedding rake also works well for pulling loose hair from body brushes. Do this outside or over a trash bin so hair does not end up back in your grooming box.
Does vinegar dissolve hairbrush buildup?
White vinegar helps break down soap residue, sweat, and mild buildup on synthetic bristles, but it will not dissolve tightly packed hair on its own. Combine vinegar with mechanical removal first, then soak the brush head in a 1:1 vinegar and water solution for 10 to 15 minutes. Rinse and air dry completely. Skip vinegar on natural fibers and wooden handles, since the acid can dry out and crack them over time.