

Table of Contents
- Grooming Essentials: Building Your Horse Grooming Kit
- Feeding and Watering Equipment for New Horse Owners
- Tack and Riding Gear: How to Fit a Saddle Correctly
- Basic Horse First Aid Kit List for New Owners
- Stall and Stable Maintenance Supplies
- Blanketing and Seasonal Care for Essential Gear
- Budgeting, Used vs. New Gear, and Maintenance Schedules
- Trailering and Transportation Basics
- Safety Gear for Riders
- Conclusion: Your First 30 Days of Gear Buying
- Frequently Asked Questions
Last Updated: September 13, 2026
Grooming Essentials: Building Your Horse Grooming Kit
Ask ten horse owners what belongs in a grooming kit and you'll get ten answers, but the core tools never change. A complete horse grooming kit starts with a curry comb, hard brush, soft brush, hoof pick, and mane and tail comb. Add a sweat scraper for bath days and fly spray for turnout.

New horse owners often buy brushes in the wrong order of importance. The curry comb loosens dirt, the hard brush removes it, and the soft brush finishes the face and legs, where skin is thin. Skip a step and grit rubs under the saddle.
A grooming tote keeps everything in one place. Brushes by the door get used daily; scattered across the tack room, grooming becomes a chore you postpone.
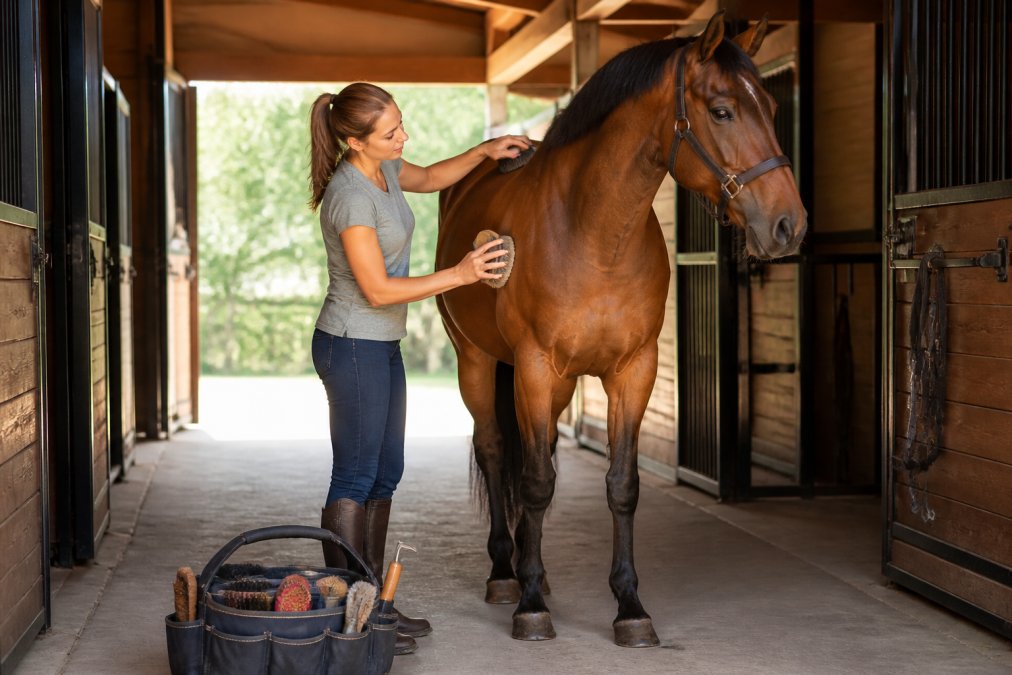
What Belongs in a Starter Grooming Tote
- Curry comb (rubber for sensitive horses, metal for heavy winter coats)
- Hard brush for body dirt
- Soft brush for face and finishing
- Hoof pick
- Mane and tail comb
- Sweat scraper
- Fly spray and fly mask for turnout season
The 10-Piece Horse Grooming Kit covers every item on that list and arrives with a tote bag, which is why it's the first thing we recommend to new owners. For a step up, the 8-Piece Horse Grooming Box Kit stores everything in a rigid box that survives being kicked around a barn aisle.

Feeding and Watering Equipment for New Horse Owners
Feeding equipment is where new owners overspend and under-plan. You need a feed pan, a water bucket, a salt block, and a hay net or slow feeder. Everything else is convenience.
Horses drink far more than new owners expect, and in winter, when intake drops, colic risk climbs. Keep two buckets in the stall and rotate them so one is always clean and full. A slow feeder hay net stretches forage across the day, matching how a horse's digestive system works.
The Hay Net for Horses Slow Feeder is a practical starting point for owners managing turnout and stall time together.
Tack and Riding Gear: How to Fit a Saddle Correctly
Learning how to fit a saddle correctly is the most important skill a new owner can develop, because a poorly fitted saddle causes back soreness, behavior problems, and vet bills. The saddle should sit level, clear the withers by two to three fingers, and let the shoulder move freely.
Place the saddle without a pad, check clearance at the withers and behind the shoulder, then add your pad and recheck. The girth should sit two to three fingers behind the elbow, not in the armpit. If the saddle bridges, contacting front and back but not the middle, it doesn't fit.
Checking Bridle and Girth Fit
A bridle should allow two fingers under the cheekpiece and noseband, and the bit should create one or two wrinkles at the mouth corner. A girth too tight restricts breathing; too loose and the saddle rolls. Tighten in stages.
| Gear Item | Fit Check | Common Mistake |
|---|---|---|
| Saddle | 2-3 finger wither clearance | Buying by seat size only |
| Bridle | 2 fingers under cheekpiece | Noseband too tight |
| Girth | 2-3 fingers behind elbow | Over-tightening at once |
| Saddle pad | Even contact, no bunching | Pad too thick for saddle |
For daily schooling and trail prep, a well-fitting saddle pad and correctly adjusted girth matter as much as the saddle. If unsure, have a saddle fitter out once, the cheapest money you'll spend on your horse's comfort.
Basic Horse First Aid Kit List for New Owners
A basic horse first aid kit list covers wounds, temperature, and emergencies. Every barn needs sterile gauze, vet wrap, a wound cleanser such as chlorhexidine, a digital thermometer, scissors, and disposable gloves. The difference between a kit that works and one that sits there is knowing what each item does and when to reach for it.
Build the kit in three layers so you can grab the right one fast.
Layer 1: Wound care. Sterile gauze pads (4x4 and larger), rolled gauze, self-adhering vet wrap, a wound cleanser, antibiotic ointment, and saline for flushing. For a fresh cut: flush, clean, cover, wrap. Never scrub a wound with a stiff brush or reuse a dirty sponge.
Layer 2: Assessment. A digital thermometer, a stethoscope, and a notebook for baseline readings. Take a baseline when your horse is healthy and write it down. A normal adult resting temperature sits around 99 to 101 degrees Fahrenheit, with a resting heart rate in the high 20s to low 40s beats per minute and respiration around 8 to 16 breaths per minute (merckvetmanual.com). Your horse's normal may sit at one end of that range, which is why you record it.
Layer 3: Handling and protection. Disposable gloves, blunt-tip scissors, a hoof pick kept separate from your grooming pick, a headlamp, and duct tape. A horse in pain can move fast, and gloves protect you as much as the horse.
Reading the Signs That Mean Call the Vet
The kit only helps if you know when to stop treating and start dialing. Owners commonly wait too long on three things:
- A wound that won't stop bleeding after 10 to 15 minutes of steady pressure, or any wound over a joint, tendon, or the eye.
- A temperature above 102 degrees Fahrenheit at rest, or any fever paired with going off feed or acting dull.
- A horse that won't eat, won't drink, or is pawing and looking at its flank, colic signs that escalate quickly and don't wait for morning.
For puncture wounds, deep cuts, or anything involving a joint, call the vet before you apply ointment. Covering a wound can hide the problem and delay treatment.
Keep the kit near the barn exit, not buried in a tack trunk. Restock anything you use within a week, the item you used last time is the one you'll need next time.
Stall and Stable Maintenance Supplies
Stable maintenance comes down to three tools: a pitchfork, a wheelbarrow, and a muck bucket. Add a stiff broom, a shovel, a hose with a spray nozzle, and a manure fork that holds bedding but drops fines, and you can handle daily and deep cleaning without borrowing from a neighbor. The tools are easy; the schedule keeps a barn from becoming a chore.
A Maintenance Schedule That Actually Holds Up
Most guides tell you what to buy and stop there. Here's the cadence that keeps a stall clean and a horse healthy:
- Daily: Pick the stall, remove wet spots, and top off bedding. A stall picked twice a day stays drier and uses less bedding than one picked once.
- Weekly: Scrub and refill water buckets, wipe down the feed pan, and sweep the aisle. Bucket slime builds fast in warm weather and puts horses off drinking.
- Monthly: Pull and clean under stall mats, scrub walls to the height a horse can reach, and check for loose boards, protruding nails, and chewed edges. A horse that cribs or weaves will find every weak point.
- Seasonally: Deep-clean the whole stall, inspect the floor for soft spots, and re-level footing in the aisle. This is also the time to check ventilation, ammonia smell at nose height means airflow is failing, and that irritates airways.
Bedding Math and the Mat Trade-Off
Bedding choice drives your maintenance routine and monthly cost more than any tool. Stall mats reduce bedding use and give a firm surface, but must be lifted and cleaned underneath, urine trapped under a mat is a smell and hoof-health problem. Loose bedding is easier to muck but disappears faster, and a horse stalled more hours needs more of it.
A practical setup for a 12x12 stall is mats over the base with a light layer of bedding on top, enough to absorb urine and give a soft place to lie down, not a deep bed that hides wet spots. Shavings are easy to sift, pellets absorb more per pound but need dampening to expand, and straw is cheap but less absorbent. Pick one and stay consistent so you learn your weekly usage.
Plan cleaning around turnout: mucking while your horse is out saves working around a moving animal and keeps the stall cleaner. Keep dedicated tools for the stall and a separate set for the aisle so you're not dragging manure into a clean space.
Blanketing and Seasonal Care for Essential Gear
Blanketing decisions should follow temperature, not the calendar. A horse with a full winter coat in mild weather doesn't need a blanket; a clipped horse does. If your horse is shivering, blanketed, or losing weight, add a layer.
A turnout blanket with a detachable neck cover handles the widest range of conditions, because you can strip the neck piece on warmer days. The 1680D Turnout Blanket with Detachable Neck Cover is built for wet, cold weather and adjusts across seasons.

Budgeting, Used vs. New Gear, and Maintenance Schedules
Budgeting for ongoing costs is where owners get caught out. The purchase price of a horse is the smallest number you'll write down. Feed, hay, bedding, farrier visits, and vet care are recurring, and they don't pause when your paycheck does.
Set a monthly gear and care budget, treat it as fixed, and track actual spending for three months, the pattern will show where to trim.
Used gear is a legitimate way to save money on certain items and a bad idea on others. Here's the honest split:
| Item | Used OK? | Why |
|---|---|---|
| Saddle | Only with a fitter | Fit is horse-specific |
| Bridle and reins | Yes, if leather is sound | Check stitching and buckles |
| Blankets | Yes, if waterproofing holds | Test with a hose |
| Grooming tools | Yes, if cleaned | Sanitize before use |
| Helmets | Never | Invisible impact damage |
| Bits | Rarely | Wear and hygiene concerns |
Helmets are the one item you should always buy new (astm.org). A dropped or impacted helmet can have internal damage you can't see, and it won't protect you in a fall. The TuffRider Starter Riding Helmet is an affordable entry point that meets the baseline safety expectations for schooling and trail riding.
Maintenance schedules keep gear working. Clean leather tack every few rides, condition it monthly, and check stitching and buckles each time. Wash saddle pads every couple of weeks, and replace frayed lead ropes and worn girths before they fail.
For owners managing multiple horses or riders, buying in bulk on consumables like fly spray, vet wrap, and bedding saves real money over a season.
Trailering and Transportation Basics
Trailering gear is easy to overlook until the day you need it. At minimum, keep a halter and lead rope dedicated to the trailer, a hay net for long trips, and a basic first aid kit that travels with you. Never trailer a horse without a halter on and a lead rope within reach.
Check your trailer floor, tires, and hitch before every trip, a soft spot in a wooden floor or a low tire is a breakdown waiting to happen. Load with a helper when you can, and let your horse settle before you pull out.
Safety Gear for Riders
Rider safety gear starts with a properly fitted helmet and doesn't stop there. A safety vest, gloves, and boots with a heel are the practical additions most new owners add within their first year. Boots with a heel prevent your foot from sliding through the stirrup, a real and serious risk (the CDC).
Bell boots and exercise boots protect your horse's legs during work, especially on trails or in turnout. Not mandatory for every ride, but worth owning if your horse interferes or works on uneven ground.
Fit matters for rider gear too. A helmet that shifts when you shake your head is too loose. A vest that restricts your arms is too small. Try gear on before you commit.
Conclusion: Your First 30 Days of Gear Buying
The first month of horse ownership is a scramble, and the gear list can feel endless. Focus on essentials first: grooming tools, feeding equipment, a fitted saddle, and a stocked first aid kit. Add blanketing, trailering, and rider safety gear as the seasons and your riding plans demand it.
At Horsey Horse Store, we built our selection around exactly this reality. Practical grooming supplies, dependable tack, and barn accessories that hold up to daily use, backed by free shipping over $25, 30-day returns on clean, unused items, and secure checkout. Whether you're prepping for a weekend trail ride or organizing a busy tack room, the right gear makes the routine easier.
Get started with Horsey Horse Store and build a setup that supports your horse and simplifies your barn days.
Frequently Asked Questions
What are the essential things to buy for your first horse?
Start with a grooming kit that includes a curry comb, hard brush, soft brush, hoof pick, and mane and tail comb. Add a halter and lead rope, a feed pan and water bucket, a basic first aid kit with vet wrap and sterile gauze, and a saddle and bridle that fit correctly. A digital thermometer and fly spray round out the first month. You can add blankets, boots, and lunge equipment as your routine develops. Buy the basics first, then fill gaps as you learn what your horse actually needs day to day.
What is the 1/2/3 rule for horses?
The 1/2/3 rule is a rough guide for daily time and care: one hour of turnout or exercise, two feedings per day, and three checks (morning, midday, evening) for water, hay, and general condition. It is not a formal standard, just a practical way to structure a routine. New horse owners can use it to build habits around feeding, watering, and observation. Adjust based on your horse's age, workload, and veterinary advice, especially during extreme heat or cold.
How do I know if a saddle fits my horse correctly?
Place the saddle on your horse without a pad and check that the tree clears the withers by about two to three fingers. Look for even contact along the panels and no bridging or rocking. Girth up and watch for pinching behind the shoulder. Ride in it for short sessions and check for dry spots or rubs after. If the saddle shifts, lifts at the back, or your horse flinches when you girth up, it does not fit. A saddle fitter can confirm what you find.
What should a basic horse first aid kit include?
A basic horse first aid kit list includes vet wrap, sterile gauze, wound cleanser such as chlorhexidine, a digital thermometer, scissors, and disposable gloves. Add a stethoscope if you want to check heart rate and gut sounds. Keep it in a clean, labeled tote in the barn. Restock after every use so nothing is missing when you need it. For anything beyond minor cuts or a mild scrape, call your veterinarian before treating on your own.
How do you organize a tack room for a new horse?
Group gear by task: grooming on one wall, tack on another, first aid and medications in a closed cabinet. Hang bridles on individual hooks so they keep their shape. Store saddles on racks, not on the floor. Keep feed and hay in sealed containers away from tack to avoid dust and pests. Label bins for boots, wraps, and blankets. A simple layout with everything visible saves time on busy mornings and makes it obvious when something is missing or needs cleaning.
Should I buy used or new gear as a new horse owner?
Used gear works well for items that do not affect safety, like buckets, feed pans, and some grooming tools. Buy new for anything structural: helmets, saddles, and anything that has been in a crash or shows cracked leather. Check used saddles for a broken tree and used blankets for missing hardware. New gear from a retailer with a return policy gives you a fit check. Mixing used and new keeps startup costs down without cutting corners on safety.