

Table of Contents
- Compare Top Horse Bridle Sets and Tack Picks
- How to Measure a Horse for a Bridle
- Types of Horse Bits for Beginners
- Leather Care for Horse Tack
- Bridle Styles for Western and English Disciplines
- Pony, Arabian, and Draft Sizing: Getting the Fit Right
- Common Bridle Buying Mistakes to Avoid
- Frequently Asked Questions
Last Updated: September 16, 2026
Compare Top Horse Bridle Sets and Tack Picks
If you're shopping for horse bridle sets, fit matters more than price. A bridle that pinches the cheek pieces or sits too low on the poll will make even a quiet horse fuss, and no amount of tooled leather fixes that. This guide covers sizing, materials, bit selection, and care.
A common mistake is ordering by breed name alone: a cob from one maker can fit a horse that needs a full from another, because headstall measurements vary more than most catalogs admit.
| Pick | Product | Price | Best For |
|---|---|---|---|
| Best storage add-on | Intrepid International 4-Hook Bridle Rack | $56.99 | Keeping bridles off the floor |
| Best for barrel work | HILASON Braided Poly Barrel Racing Reins | $51.99 | Grip and speed |
| Best all-round reins | Outdoor Horse Reins | $57.87 | Color matching and trail use |
| Best budget reins | HILASON Braided Cotton Barrel Reins | $45.99 | Everyday schooling |
| Best beginner bit | Pssopp Apple Flavor Loose Ring Snaffle Bit | $82.99 | Green horses and soft mouths |
| Best step-up bit | Double-Jointed Loose Ring Snaffle Bit | $69.99 | Horses that lean on the bit |
| Best for experienced hands | EVTSCAN Stainless Steel Pelham Bit | $79.99 | Strong, schooled horses |
Every one of those ships free over $25, with 30-day returns on clean, unused items.

How to Measure a Horse for a Bridle
Measuring takes about five minutes and a soft tape measure. You need four numbers: crown piece length across the poll, browband width, cheek piece length from crown to bit ring, and mouth width for bit sizing.
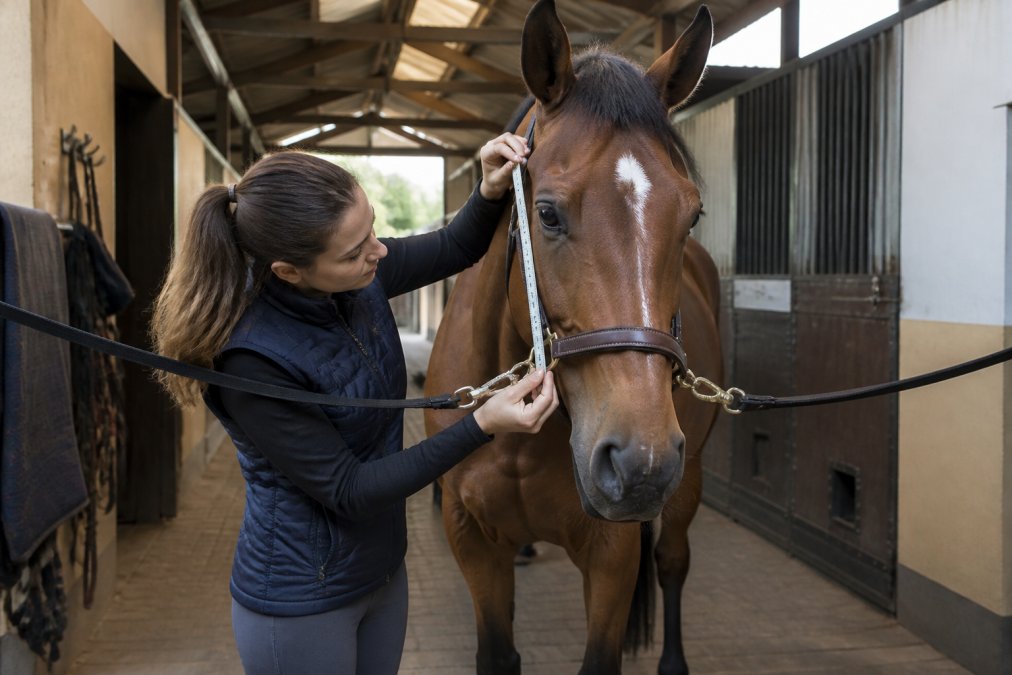
Work in this order:
- Stand your horse square and quiet, ideally in cross-ties.
- Run the tape over the poll from one ear base to the other for the crown measurement.
- Measure the browband line from just behind one ear to just behind the other.
- Measure from the top of the head down to the corner of the mouth for cheek piece length.
- Note the mouth width for bit sizing.
Types of Horse Bits for Beginners
A snaffle bit is the right starting point for almost every horse and rider. It works through direct rein pressure with no leverage, making it the most forgiving design. Shape matters more than price.
How mouthpieces distribute pressure.
- Single-jointed (broken) snaffle: the joint hinges upward into the tongue and, on a hard pull, can create a nutcracker effect across the bars. A horse with a thick tongue or low palate often fusses in one.
- Double-jointed (French link or lozenge) snaffle: the center plate lies flat on the tongue and spreads pressure across a wider area instead of one hinge point. Many horses accept this more readily than a single joint.
- Mullen mouth: a solid, gently curved mouthpiece that gives the tongue a stable surface. Good for a horse that dislikes a joint.
- Roller or copper link: encourages salivation and gives the horse something to mouth instead of fighting. Copper wears faster than stainless steel but is often accepted well.
Pressure points to watch on any bit.
- Bars: the gap between the front and back teeth where the mouthpiece rests. A too-wide bit slides and rubs.
- Tongue: a thick mouthpiece on a thick tongue crowds the mouth, causing the horse to open its mouth or put its tongue over the bit.
- Palate: a high port or thick joint can contact the roof of the mouth, which is why a low-palate horse often does better in a flatter mouthpiece.
- Corners of the mouth: loose rings reduce pinching, fixed cheeks increase it. Check for rubs after every ride.
- Chin groove: only relevant with a curb chain. A chain that is too tight is constant pressure the horse cannot escape.
Leather Care for Horse Tack
Leather lasts decades when you clean it after sweat and dirt, and months when you don't. The failure point is almost always dried sweat left in the cheek pieces and crown, which stiffens the leather until it cracks at the bend.
A simple routine covers it:
Intrepid International 4-Hook Bridle →
- Wipe the bridle with a damp sponge after every ride
- Use saddle soap weekly to lift grime from tooled leather
- Apply a light conditioner to straps, never soak them
- Check stitching at the bit attachment and buckle adjustment points monthly
- Store the bridle on a hook, not in a heap on the tack room floor
Bridle Styles for Western and English Disciplines
Western and English bridles solve different problems, and your discipline should drive the choice. A western bridle typically skips the noseband and uses a browband or single ear headstall to keep the crown in place, suiting neck-reining and one-handed contact.
The components to know:
- Headstall: the crown and cheek pieces that hold the bit
- Browband: keeps the headstall from sliding back
- Single ear: a western alternative that loops over one ear
- Throat latch: the strap under the jaw that stops the bridle slipping forward
- Curb chain: used only with use bits like a Pelham
Pony, Arabian, and Draft Sizing: Getting the Fit Right
Breed labels on bridle packaging are a starting point, not a guarantee. Pony, cob, full, and draft sizes shift by maker, so your tape measure numbers are the only reliable guide. This is the step most buyers skip, and why so many bridles end up returned or unused.

- Ponies: shorter cheek pieces and a narrower browband than a standard full. A pony in a full-size browband usually shows rub marks behind the ears within a few rides.
- Arabians: often a finer muzzle and shorter head than the breed label implies. A wide noseband on a fine muzzle sits awkwardly and can interfere with the bit, so measure the noseband line rather than assuming full fits.
- Draft horses: longer cheek pieces, wider browband, and a larger bit, commonly a 6-inch mouth rather than the 5-inch standard. A draft in a full-size bridle usually has the bit too high and the browband too tight.
- Warmbloods and Thoroughbreds: frequently fall between cob and full, which is exactly why the tape measure beats the label.
Common Bridle Buying Mistakes to Avoid
The most expensive bridle mistake is buying for looks before fit. Tooled leather photographs beautifully, but a stiff, over-decorated headstall that doesn't match your horse's measurements will sit in the tack room.
Other repeat offenders:
- Ordering a size up "to be safe," which drops the bit too low in the mouth
- Mixing brands across a bridle, so the cheek pieces don't match the crown
- Ignoring poll pressure on a horse that throws its head
- Buying a use bit before the horse understands direct rein contact
- Skipping a bridle rack, then finding the bridle trampled in the aisle
Frequently Asked Questions
What is included in a standard horse bridle set?
A standard horse bridle set includes the headstall with cheek pieces and a browband or single ear, a bit attachment, and reins. Some sets add a breast collar, curb chain, or throat latch. The exact parts depend on the discipline: Western sets often come with split reins and a curb chain, while English sets use a noseband and buckle adjustments. Check the listing photos and specs so every piece matches your riding setup.
How do I pick a bridle for my horse without trying it on first?
Measure first, then match the set to your horse's build. Use a soft tape to record cheek piece length, browband width, and noseband circumference, then compare those numbers to the size chart. Pony size fits most under 14 hands, Arabian and cob cuts suit finer heads, and draft horse fit runs larger. If the fit is off, Horsey Horse Store accepts 30-day returns on clean, unused items.
How much do horse bridle sets cost?
At Horsey Horse Store, individual tack pieces range from $45.99 for the HILASON Braided Cotton Barrel Reins to $82.99 for the Pssopp Apple Flavor Loose Ring Snaffle Bit. A complete setup depends on which headstall, reins, and bit you pair. Free shipping applies on orders over $25, and all prices are listed directly on each product page so you can build a set that fits your budget.
What is the most comfortable bridle for a horse?
Anatomically shaped headstalls that avoid the cheekbones and facial nerves reduce poll pressure and rubbing. Padded nosebands and browbands help, but fit matters more than padding: a loose browband or pinching cheek piece causes more discomfort than a plain leather one that sits correctly. Check the throat latch for two fingers of clearance and confirm the bit attachment sits level before you ride.
How often should I condition leather tack?
Clean leather after every ride with a damp cloth to remove sweat and dirt, then condition every four to six weeks depending on how often you ride and how dry your climate is. In arid regions, condition monthly. Check hardware durability at the same time: loose Chicago screws, stretched buckle adjustment holes, and worn bit attachment points are the first signs a headstall needs repair or replacement.